In this tutorial, I will explain how to operate common GRBL-powered CNC machines using free and open source firmware on Linux. When shopping for (or searching for tutorials on how to build your own) a CNC laser engraver, desktop milling machine, or 3D printer, you might see the acronym GRBL everywhere.
What is GRBL?
GRBL is a free and open source software flashed to microcontrollers based on the ATmega 328 (such as the Arduino Uno), allowing them to easily control multi-axis motor drivers and thus a complete computer numeric control (CNC) machine. To have a full CNC machine, one needs a controller, a motor driver, the motors, the mechanical structure with linear and/or angular guides, and a source of operation. The source of operation can be a 3D printer nozzle. The motor driver boards come in diverse designs and formats. GRBL allows CNC machines to be precise and powerful while keeping their affordability.
I must say that there are several well-written guides on the topic on the internet. I don’t pretend to bring new information to the table, but maybe this will be a nice summary for those who are considering building their own DIY machine, getting a commercial one, understanding a bit more of what they have in hand, or how to operate one at work using their own Linux system.
G-code explanation
A g-code is a set of instructions to the controlling software that will be sent to the microcontroller. If we open a generic g-code file, we will see something like
...
G1 X90 Y50 Z0.5 F3000 E1
...
We then import this code to the software installed in our computer, which will in turn send instructions to the microcontroller to operate the motors in a way specified by the g-code and complete the task given. In the next section, I will demonstrate how it works in practice.
What is being done “in the background”?
By running lsusb on a machine with a GRBL-powered device connected via USB, I get the output
...
Bus 002 Device 002: ID 1a86:7523 QinHeng Electronics CH340 serial converter
...
And by checking ls -l /dev/ttyUSB*,
crw-rw----+ 1 root dialout 188, 0 Aug 15 13:53 /dev/ttyUSB0
indicating that a regular tty USB device is connected to the machine.
Just like any microcontroller connected via USB, we can send and receive commands by writing them to the USB tty device. GRBL comes in 115200 and 9600. If you open your interface using cutecom or your software of choice, you can send g-code commands to the machine and see how it responds. For instance,
G91 X10 F1000
will move your machine’s head 10 mm on the positive X-axis. Equivalently,
G91 Y20 F1000
moves your machine’s head 20 mm on the positive Y-axis.
In the video below, I have connected a SparkFun GRBL powered laser engraver to a computer, launched cutecom, connected to the machine, and sent some commands. I recorded through a webcam what are the physical results of the inputs given and how the laser head will move in response to these commands.
In summary, a g-code file will be a set of instructions to complete the given task and manufacture your project. In case you’re interested in learning further, check GRBL’s git markdown page on commands for a full explanation of what each command will do.
Generating a g-code for a 2D project (machining or laser cutting)
In order to operate your CNC, you will need a g-code. Some programs are capable of importing 2D vector images, generating the g-code for you, and sending the instructions through the serial port to your machine. However, it is probably better to have different specific tools that do a single job and do it well. I personally like to use Inkscape for vector drawing, which is a powerful tool for the task that gets the job done and does it well. It accepts a bunch of plugins where you can convert your vector drawings into g-code. One particular useful one is the JTech Photonics Inkscape laser plugin, since you can configure and add the laser power directly to your g-code.
Installation is pretty straightforward, everything is thoroughly explained on their github repository.
After drawing your project on Inkscape, just click on “Extensions”, then “Generate Gcode”, then “J Tech Photonics Laser Tool…”. A pop-up will appear, where you can set parameters like motor travel speed or laser intensity. For more details, please check their web page linked above.
Operating your machine
To send serial commands to your GRBL microcontroller, you need an interface that will convert the g-code into commands that make sense to the machine. There are many tools available to do this, but my favorite ones are CNCjs and bCNC. They both achieve the same purpose through two different philosophies/paradigms, which I will explain below.
CNCjs
CNCjs uses Node.js to create a beautiful web-interface where you can import g-code files and control your CNC running Grbl, Smoothieware, or TinyG, through USB, bluetooth or wi-fi. The main advantage of this method is that you can set up a small single-board computer connected to your CNC through USB and configure it to run a web server which can be accessed remotely, or use other wireless methods to connect to your machine. The main disadvantage is that you need to go through the trouble of installing nodejs, which can take up a significant amount of space if storage is an issue and complicated package management/dependencies are unavoidable. Of course, you can use their docker image and save you some trouble.
bCNC
On the other hand, bCNC is a simple but fully featured and cross platform python program described by the authors as a “swiss army knife for all your CNC needs”. The main advantage of this method is the simpler installation compared to CNCjs, given that (at the time of writing, IMO) pip is more commonplace and simpler than Node.js. Unfortunately, no official docker images are yet available, but generating one shouldn’t be an issue.
General procedure
Regardless of your method of choice, both (or any) alternatives will follow the same procedure:
- Connect your computer to the serial interface/microcontroller with the appropriate baudrate (currently 115200 for GRBL);
- Import the g-code generated by your software of choice (draw vector path image, convert to g-code);
- Run the g-code sender so the program can be executed by your CNC.
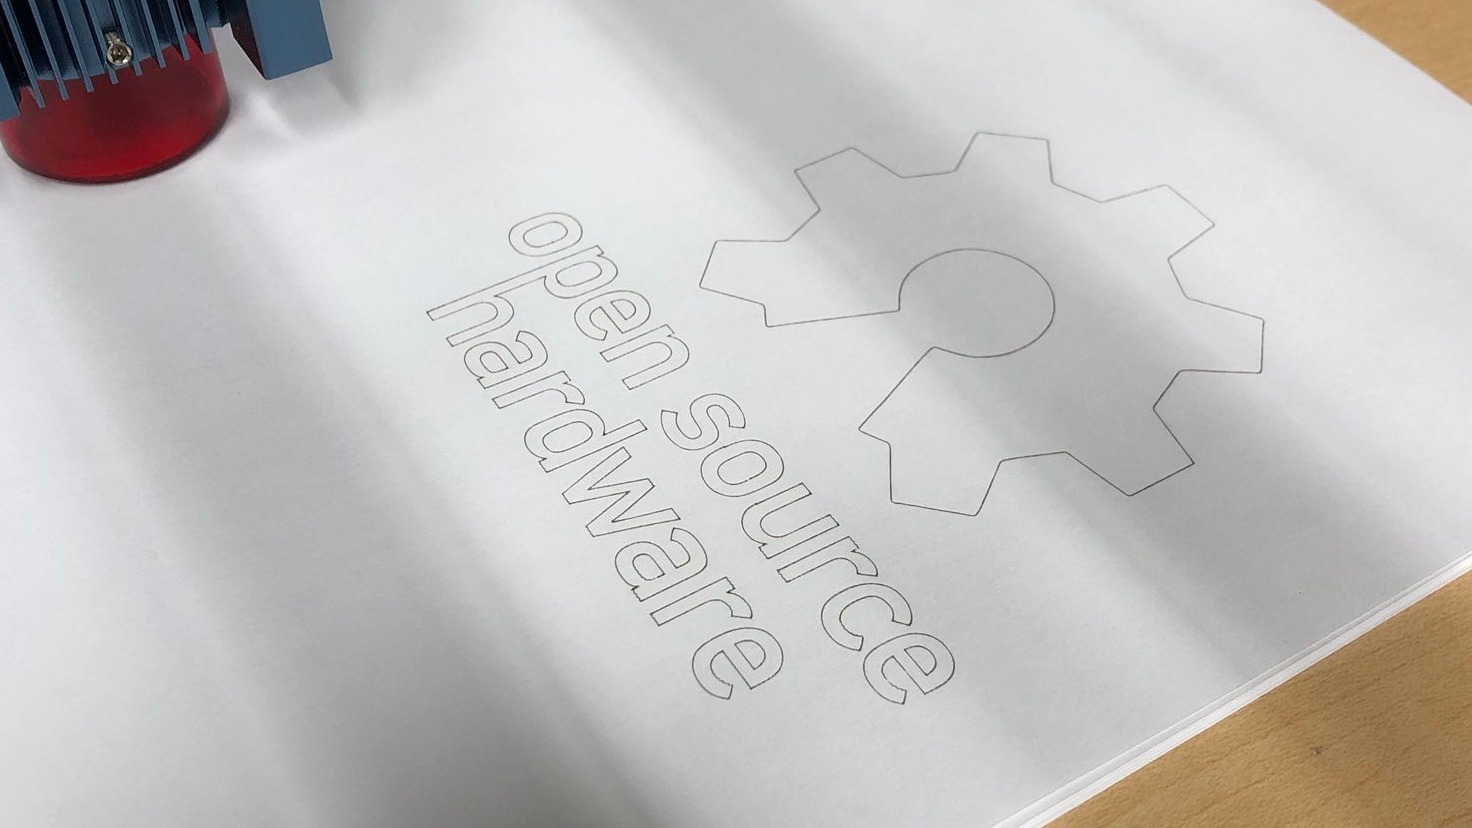
In the video below, I have used bCNC to follow the instructions generated by an Inkscape plugin to convert a vector image of the open source hardware logo to g-code.
The final result looks like this.
While it might seem complicated at first, operating a CNC using free software under Linux is a simple and achievable task. Contrary to popular belief, it is entirely possible to have a fully-functional CNC workflow nowadays using exclusively open source hardware and free software.