TL,DR: Jump to Alternative 1, gpx.studio for an online service. For an offline alternative, consider QGIS and Valhalla, or the Open Source Routing Machine.
For people who like outdoor adventures, it is always a good idea to have efficient navigation mechanisms with oneself. One of my best purchases ever was an adventure watch with GPS navigation. I cannot count how many times I quickly noticed I was accidentally going off-route while hiking because of an instantaneous notification. It usually takes a couple of seconds (at most) to look at one’s wrist when confused which way to go and avoid a long detour.
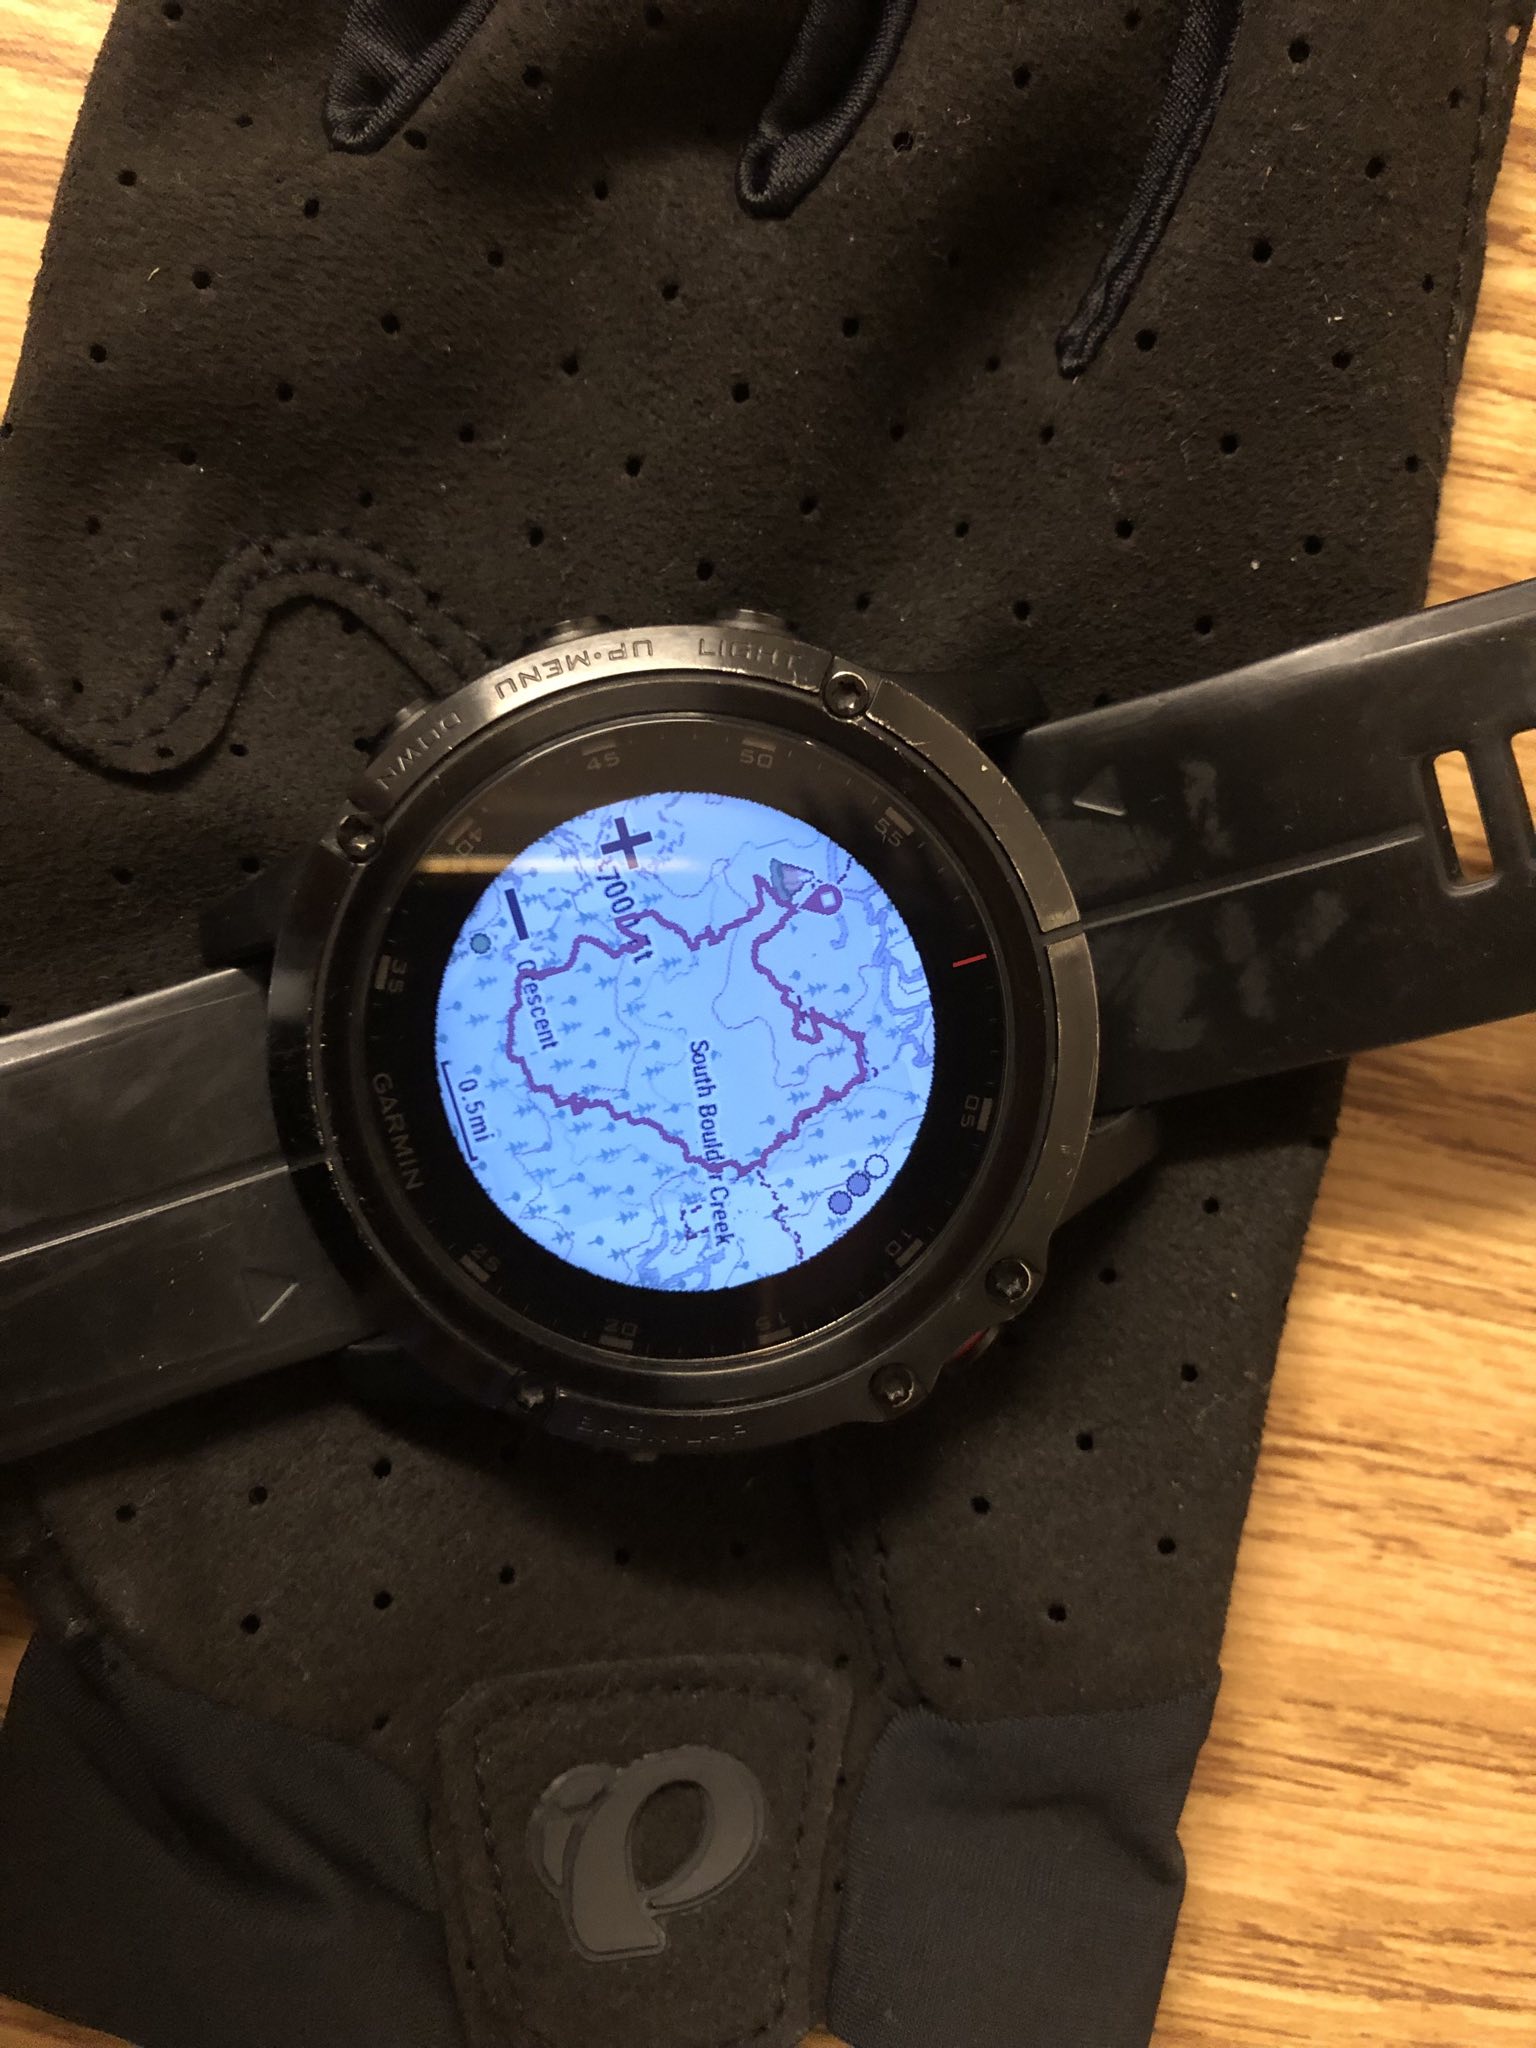 Good navigation is a must. A small and simple device like this can prevent you from spending precious time wandering off-route. GPS devices have gotten so good, that a small, affordable watch like this can provide reliable navigation for days on a single battery charge.
Most day-hikers probably just follow marked trails and signs, or at best look at a GPS app on their phones when they need directions. While carrying a dedicated GPS device is by no means a requirement to have fun in the backcountry, it is definitely an effective and convenient tool. It is much harder to get lost if you know you are off-route immediately. It is also much easier to get back on-route with a GPS device if you happen to get lost. True, you can use your phone for that, but maybe you prefer to save your battery for other purposes, or maybe you don’t want to get it and unlock it all the time.
Moreover, creating routes in advance isn’t just for areas you are visiting for the first time. It can be nice to set workout trajectories a priori for cycling or running, so you will just follow your thought-out plans instead of making them on-the-go and risk being in a situation where your route ends up being too long or too short.
Regardless of your main motivation, let’s look at how you can make your own custom .gpx files to be uploaded to your GPS device of choice.
What are GPX files?
GPX stands for GPS Exchange, which is a way of organizing and listing tracks, routes, and waypoints. The format is an XML schema open standard that can be universally understood by GPS devices and software. It is a great format because you can use your computer to generate and edit the files that will be later uploaded to your GPS device, or download them from your navigation device to analyze in more detail on your computer – all of this without any unnecessarily convoluted conversion process whatsoever!
I will explain how the files are structured below. You don’t need to know about any of this information to get started, so you can skip to the next section if you just want to generate your files and get going.
The first line of a GPX file will consist of an XML declaration.
<?xml version="1.0" encoding="UTF-8"?>
...
Right after, there will be, a gpx element, containing all the data/information that we are using in practice. Within the gpx element, a brief metadata element with author name and link to their page is declared.
...
<gpx xmlns:xsi="http://www.w3.org/2001/XMLSchema-instance" xmlns="http://www.topografix.com/GPX/1/1" xsi:schemaLocation="http://www.topografix.com/GPX/1/1 http://www.topografix.com/GPX/1/1/gpx.xsd http://www.garmin.com/xmlschemas/GpxExtensions/v3 http://www.garmin.com/xmlschemas/GpxExtensionsv3.xsd http://www.garmin.com/xmlschemas/TrackPointExtension/v1 http://www.garmin.com/xmlschemas/TrackPointExtensionv1.xsd http://www.topografix.com/GPX/gpx_style/0/2 http://www.topografix.com/GPX/gpx_style/0/2/gpx_style.xsd" xmlns:gpxtpx="http://www.garmin.com/xmlschemas/TrackPointExtension/v1" xmlns:gpxx="http://www.garmin.com/xmlschemas/GpxExtensions/v3" xmlns:gpx_style="http://www.topografix.com/GPX/gpx_style/0/2" version="1.1" creator="https://gpx.studio">

<metadata>
    <name>new</name>
    <author>
        <name>gpx.studio</name>
        <link href="https://gpx.studio"></link>
    </author>
</metadata>
...
Outside of the metadata element, but within the gpx element, there is a list of points that can be a track (trk) with trackpoints (trkpt), waypoints (wpt), or route (rte) with routepoints (rtept).
...
<trk>
    <name>new</name>
    <type>Running</type>
    <trkseg>
    <trkpt lat="39.846043" lon="-105.37843">
        <ele>2403.0</ele>
        <extensions>
        <gpxtpx:TrackPointExtension>
        <gpxtpx:Extensions>
            <surface>unpaved</surface>
        </gpxtpx:Extensions>
        </gpxtpx:TrackPointExtension>
        </extensions>
    </trkpt>
    <trkpt lat="39.846055" lon="-105.37838">
        <ele>2403.0</ele>
        <extensions>
        <gpxtpx:TrackPointExtension>
        <gpxtpx:Extensions>
            <surface>dirt</surface>
        </gpxtpx:Extensions>
        </gpxtpx:TrackPointExtension>
        </extensions>
    </trkpt>
...
</trk>
...
<wpt lat="46.9466" lon="7.44412">
   <time>2011-12-31T23:59:59Z</time>
   <name>Bundeshaus (Bern)</name>
   <sym>City</sym>
</wpt>
...
</gpx>
For more details, check the GPX 1.0 Developer’s Manual or read the Wikipedia page on GPX for more information. Enough of boring technicalities, let’s see how we can generate our GPX files!
Alternative 1: gpx.studio
Even though GPX files are simple in principle, creating them might not be a trivial task. You will need some backend application capable of linking waypoints into a full path according to a map of known terrain. Fortunately, there are some amazing programs out there capable of doing all the heavy lifting for us. One of the most accessible and “universal” ways of doing so is using a web service called gpx.studio. According to their “about” page:
“gpx.studio is a free online GPX viewer and editor”
The program is built on top of data and libraries provided by mapbox, which is a company providing maps and map services (like route planning) to customers. From my understanding, they get data from NASA, OpenStreetMaps, and some proprietary data sources to build maps and web-applet mapping and data visualization tools (like routing and traffic analysis), based on free and open source software like Node.js, Mapnik, GDAL, and Leaflet (see their Wikipedia page). I’m not a specialist, so I might be wrong, though.
gpx.studio is minimalistic, fast, full of features, and intuitive. It is capable of creating, automatically routing, and editing existent GPX routes. It is free software published on GitHub under the MIT license, meaning you can clone the repository and run your own server locally. You still have to use an API token to have access to mapbox’s services, though.
To use the service, just go to https://gpx.studio on your web browser, zoom in to your location of preference, and click on “New GPX” (top middle panel). A pop up will open on your left, where you can pick your activity from the drop-down menu. They support a plethora of activities, like (road) bike, mountain bike, hike, etc, even water and railway. After selecting your activity, just click on the map to add “constraints”/fixed points to your map. The application will automatically continue drawing a suggested route for each point that you add. Keep adding points until you have your full desired path.
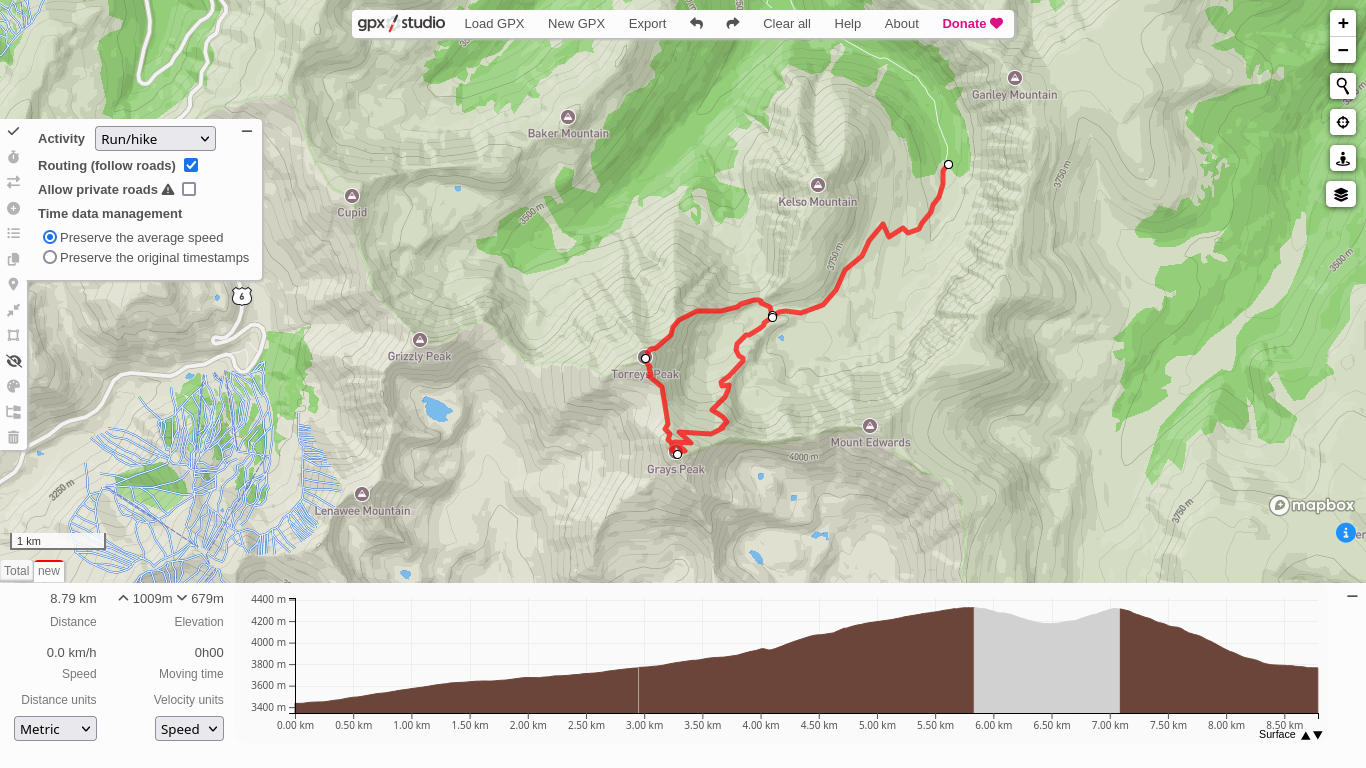
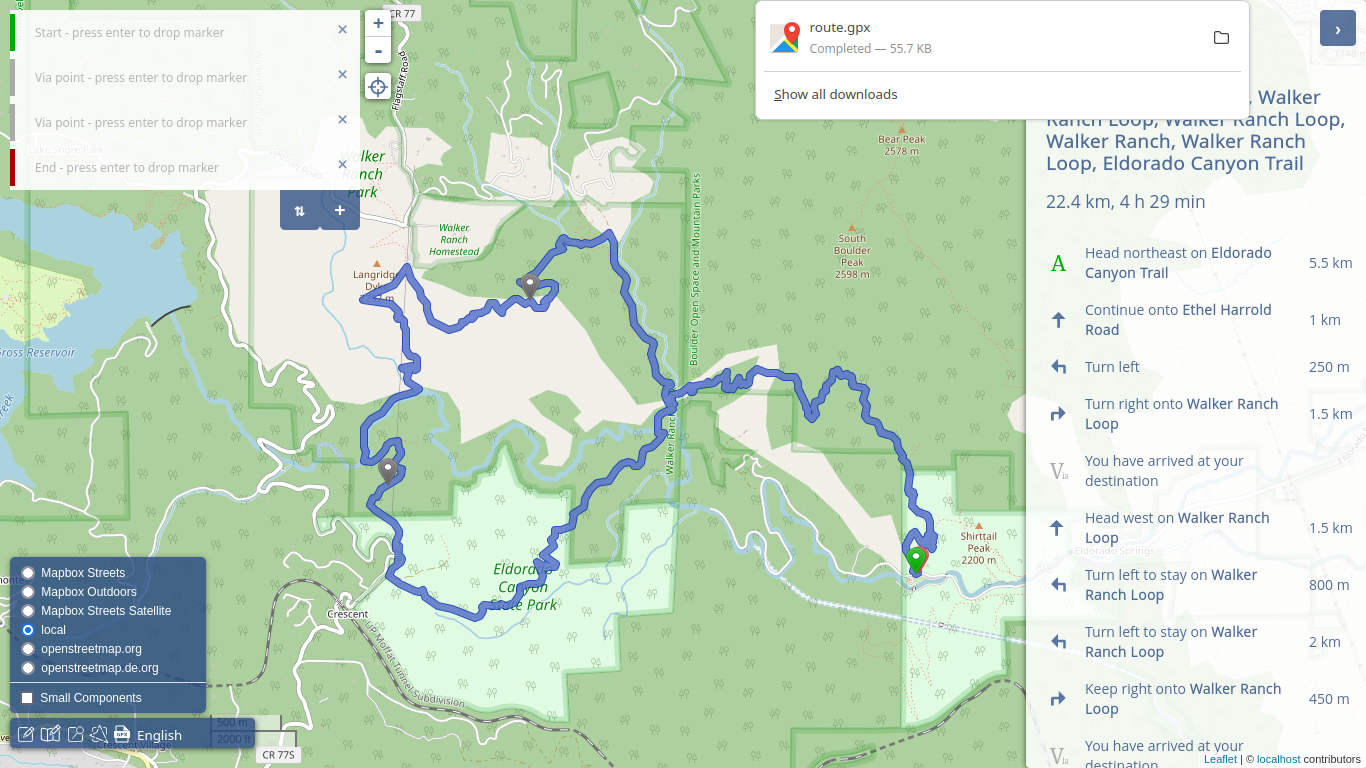
 Two loops calculated by gpx.studio. It is a minimalist, lightweight, yet fully-featured browser tool for creating GPX files.
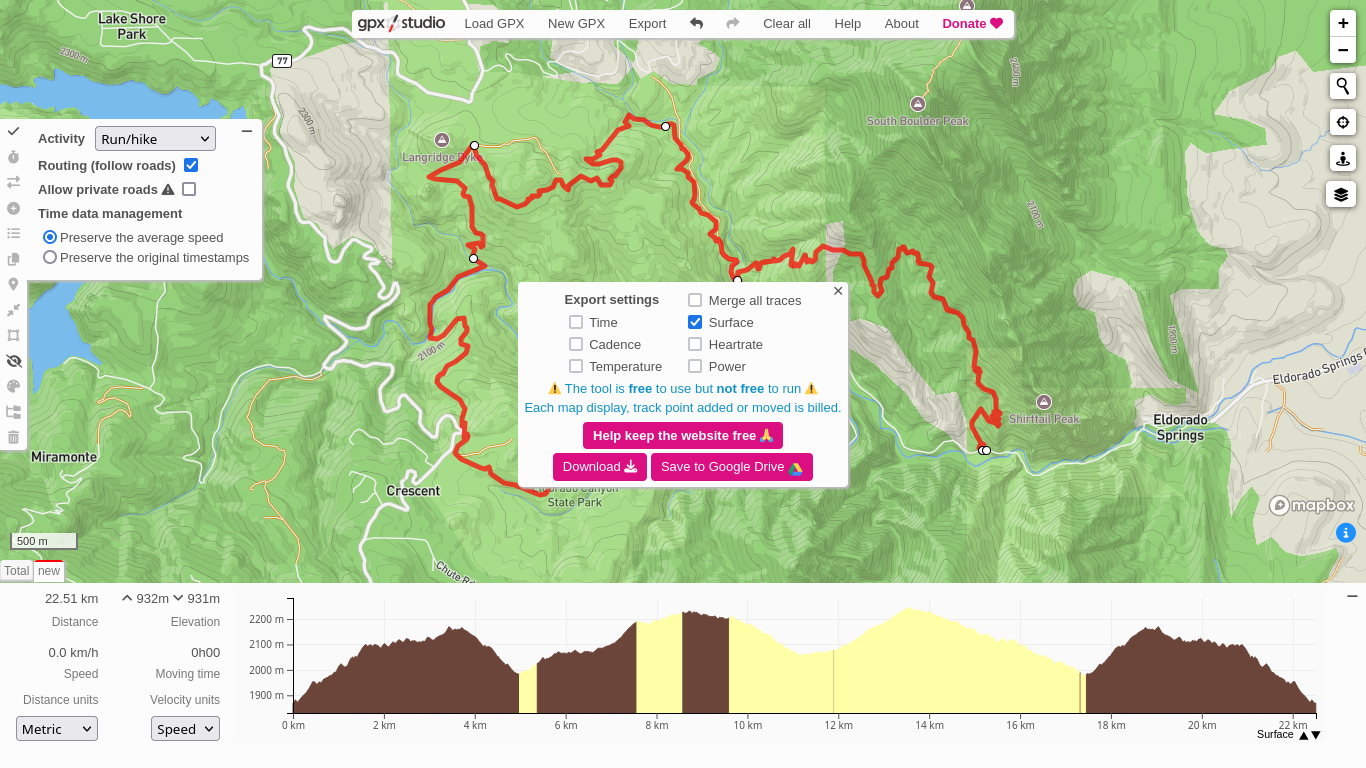
After you’re finished with your track, click on the “checkmark symbol” in the left menu. You can create another GPX route on the same “project” if you want, just click again on “New GPX” and repeat the same steps just described above. Once you’re done with all your tracks, click on “Export” and a pop up window will ask for donations and what data you need to save. If you just want your GPX tracks, select “surface”, click on “Download”, and files named new.gpx, new(1).gpx, etc will be downloaded for you. Rename the files accordingly after download.
 Downloading your work is very easy. Just click on "Export" when you are done, and a window will pop up. Click on "Download" to get the your project saved on your computer. It is unfortunate that the services provided by mapbox are proprietary, but gpx.studio is free software, so donate to the project if you can!
The process is so straightforward that in under two minutes you can open the webpage, pick your waypoints, automatically generate your route, and download your complete GPX file. Of course, you can be more careful and take your time to generate complex routes or think things through, but the software is really user-friendly and will do all the heavy-lifting for you. To exemplify how simple the process is, I recorded the video below, where I generate and download a GPX file in about one minute.
How to generate a GPX file online in about one minute using hassle-free, user-friendly, free and open source software.
Relevant feature: heatmaps and points of interest
Since mapbox collects telemetry data from fitness social media platforms like Strava, gpx.studio can actually display heatmaps with trail traffic for different types of activity (bike, hike). This might be useful if you want to have some insight on how busy an area will be for whatever reason. To activate this feature, click on the “layers” icon on the right, and under “Overlays”, “World”, “Strava Heatmap”, you will see the possible activity heatmaps you can plot.
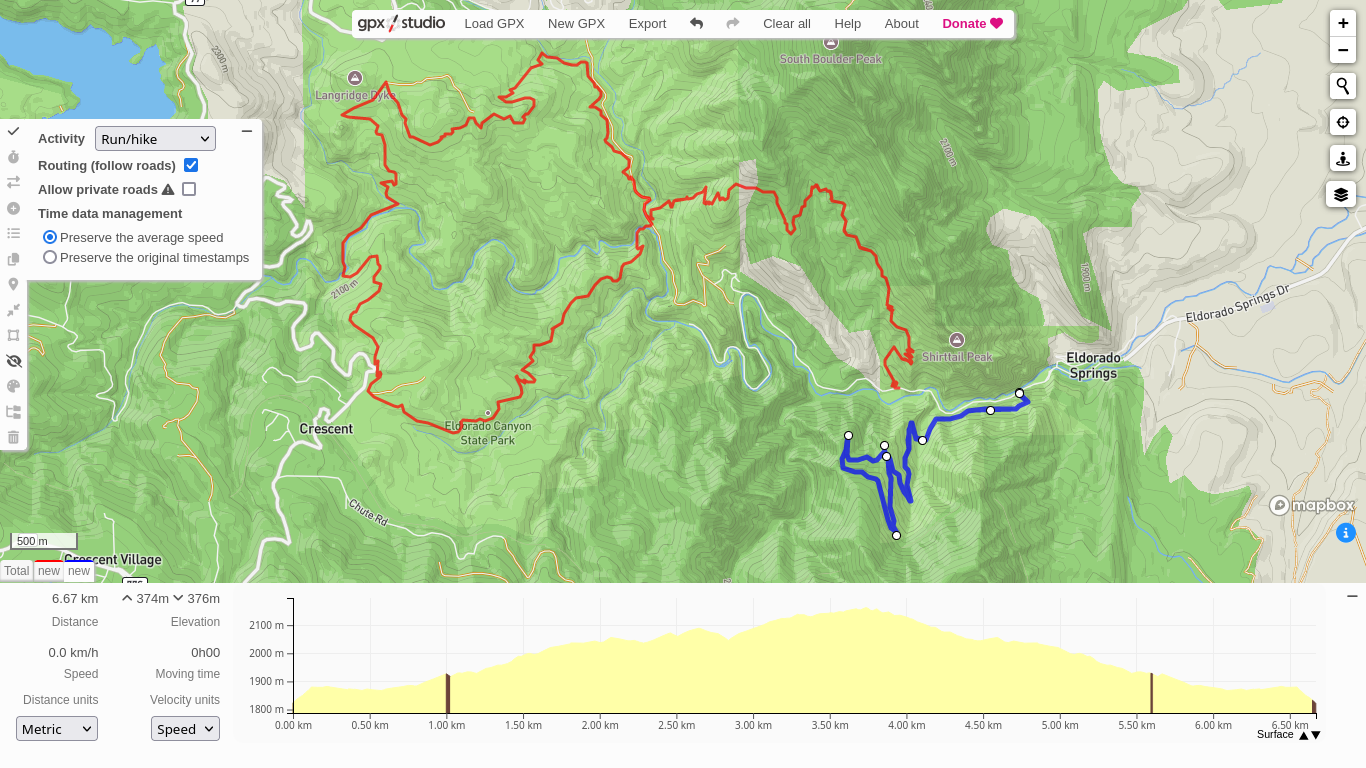
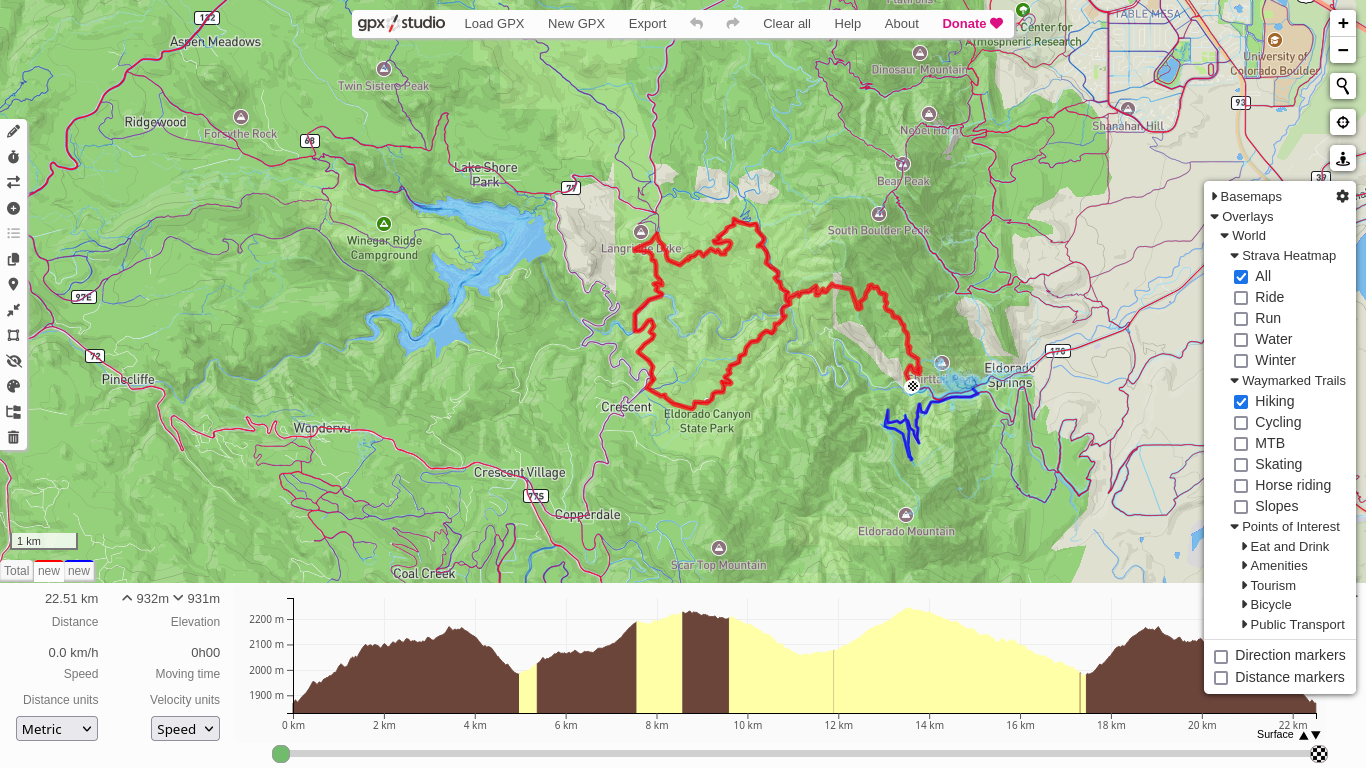 Heatmaps are a nice way of knowing what parts of an area see a lot of activity or are quieter. This includes water and snow sports, which is perhaps even more useful to see if an area is known to be suitable for traveling.
You can also add points of interest, like places to eat or bus stops, which might help a lot if you are planning longer trips crossing cities when overlanding, bike touring, or hitch-hiking. After all, who doesn’t like a nice meal from a local diner after some outdoor exercise?
Self-hosting a gpx.studio instance locally
If you don’t want to rely on the maintainer self-hosting gpx.studio, you theoretically could do it yourself by cloning the git repository, given that it is free software. There is one huge problem, though. You will still need an API key from mapbox, and . If you try to register there to get an individual user API key, it asks for an e-mail address from one of the more common providers and a credit card, regardless whether you plan on purchasing anything or not. Just so they can charge you at any time if they feel like doing so. In my opinion, this is a deal breaker, but you do you.
Good news is, there are other ways to self-host and generate GPX files that work wonderfully well, thanks to the free software community! Check out the alternatives below, like QGIS with OpenStreetMap and Valhalla, as well as the Open Source Routing Machine. Check the next sections for details.
Alternative 2: QGIS with OpenStreetMap and Valhalla
According to their own webpage, ”QGIS is a professional GIS application that is built on top of and proud to be itself Free and Open Source Software (FOSS)”. It is a Graphical information system (GIS), allowing spatial data visualization and editing. Among other things, QGIS can be used to import world street and trail maps and be itself a platform supporting automatic routing tools through addons. For instance, one can generate GPX files on QGIS on top of OpenStreetMap, with help from the Valhalla routing tool – a process that I will describe below.
First of all, you will need to download a plugin for QGIS to support OpenStreetMap. I use QuickMapServices, which is GPL licensed and does the job just fine. To download and install plugins on QGIS, open the application and click on the “Plugins” menu, then “Manage and Install Plugins…”, search for the plugin you want (QuickMapServices), and then “Install Plugin”. After the installation is done, you can display the OpenStreetMap under “Web” -> “QuickMapServices” -> “OSM” -> “OSM Standard”. A new layer with a full OSM will pop up on your work area, as shown below.
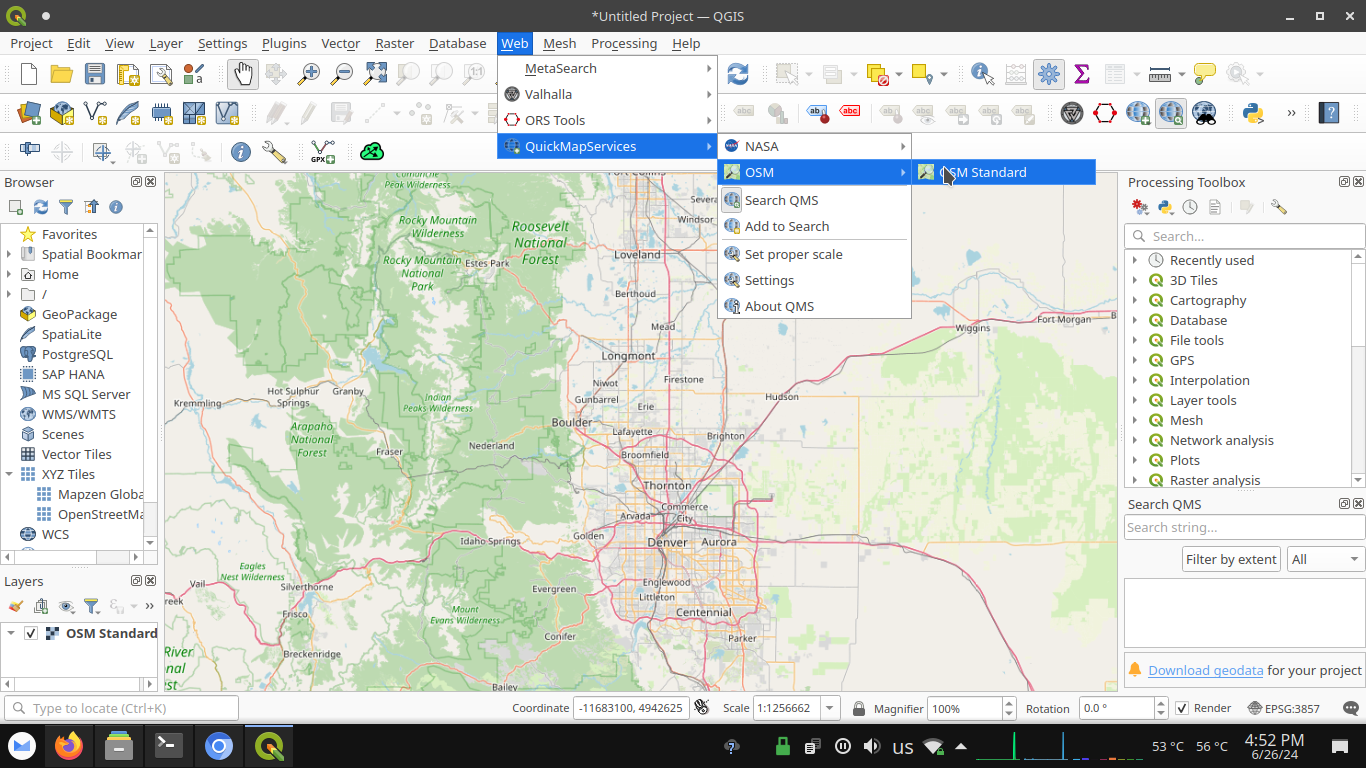 OpenStreetMap shown on QGIS with the help of QuickMapServices. An extremely useful plugin for several purposes, not just generating routes.
Now, we will need to install a second plugin, called Valhalla. It is an open source routing engine to be used with OpenStreetMap. Follow the same steps as described before to install a plugin on QGIS, but replace QuickMapServices with Valhalla. After the installation is complete and you have opened your OpenStreetMap layer as I mentioned before, zoom in to the location you want to map and click on “Web” -> “Valhalla” -> “Valhalla”. A window will pop up, where you can select your provider (pick FOSSGIS, it is an awesome online service), choose your travel mode (“Go with”, drop-down menu), and set your waypoints.
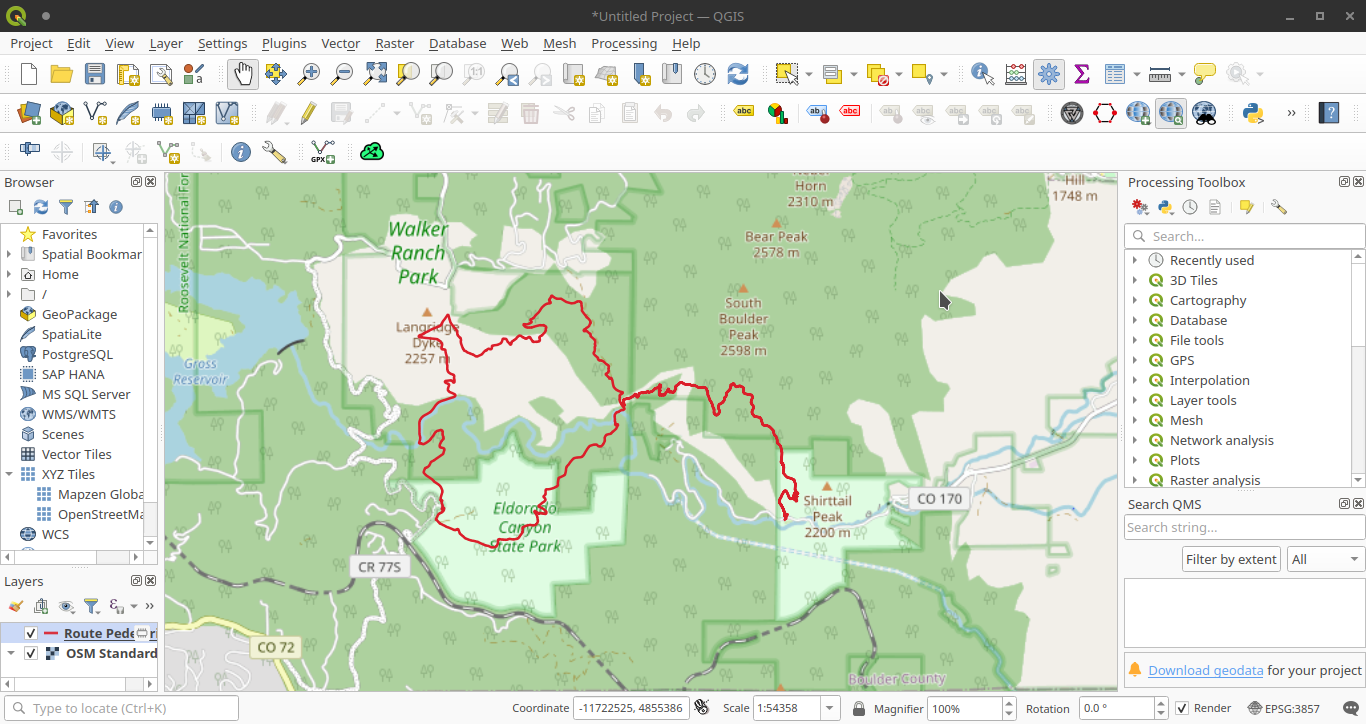 After adding the points on your map through Valhalla, you can calculate your track. The results will be displayed as a layer on QGIS.
To calculate your route, click on the green “plus” icon, add your waypoints, select your preferred travel mode (pedestrian, bicycle, etc), return to the original window, and click on “Apply”. Valhalla will calculate the track for you and automatically add a layer to QGIS. At this point, you might have noticed that it isn’t routed “live”, or “incrementally”, so you will need to add all waypoints in advance and only then calculate the GPX track. That’s definitely a con of this method, since you can’t spot a mistake and adjust immediately, but it is absolutely manageable.
After you are done with your track routing, go to the “Layers” menu. Right-click on the track layer, then “Export”, and “Save as…”. A window dialog will appear, and to properly save the file, select “GPS eXchange Format [GPX]” on the first entry, set your output file path on “File name”. The “CRS” can be “EPSG:4326 - WGS 84”. Finally, set GPX_USE_EXTENSIONS to “YES”, FORCE_GPX_ROUTE to “NO”, and FORCE_GPX_TRACK to “YES”. Click on “Ok”, and your file will be saved.
Video explaining the full process of creating GPX routes with QGIS with the help of QuickMapServices and Valhalla. Note how this is much snappier than using online services, since you only need to ping a remote server once. It is true that you can't calculate routes incrementally this way (that I know of), but that doesn't mean the method isn't effective.
It is true, there are a lot of steps and instructions that are boring and not that easy to follow unless you have done it before. For that reason, I have recorded a video showing the whole process, shown above. It consists of a lot of steps, indeed, but it isn’t too complicated. The whole process can be done in under two minutes.
Self-hosting Valhalla
Perhaps you want to do everything offline and avoid pinging FOSSGIS. That is no problem, though, given that you can host Valhalla locally.
The recommended way to self host Valhalla is using Docker, according to the maintainers. You can download the official image if you want, but they recommend using a community image with more features than the official, available here. In this post, I will use the “community image” and follow their tutorial. First, create a directory that will contain the files required by OSM and Valhalla.
# download a file to custom_files and start valhalla
mkdir custom_files
Then, you will need to download maps relevant to your area and place them in the directory you just created. You can go to https://download.geofabrik.de/ and browse their collection for your desired area. After you define what location you want, copy the link in the following format: https://download.geofabrik.de/ + subfolders/ + filename.osm.bpf. For example, for Colorado, USA, I am using https://download.geofabrik.de/north-america/us/colorado-latest.osm.pbf. But if you are creating GPX tracks in Kenya, replace north-america/us/colorado-latest.osm.bpf by africa/kenya-latest.osm.bpf. If you are creating maps in British Columbia, Canada, use north-america/canada/british-columbia-latest.osm.pbf. Etc.
Anyway, just download the maps for the desired area and place them in the custom_files directory (you can use whatever tool you want, a graphical browser, curl, wget, whatever). In my case, I am downloading maps for Colorado, (north-america/us/colorado) through wget. That is,
wget -O custom_files/colorado-latest.osm.pbf https://download.geofabrik.de/north-america/us/colorado-latest.osm.pbf
Now the fun part, get the Docker images and start your Valhalla server.
docker run -dt -v $PWD/custom_files:/custom_files -p 8002:8002 --name valhalla ghcr.io/gis-ops/docker-valhalla/valhalla:latest
Note that the first time you launch the server, it can take a long time to build all the tiles from the downloaded files (about 25 minutes on a simple personal computer). You can check the status by running
docker logs valhalla
When the process is done, localhost:8002/status will be accessible. Once the build is complete, you can go to QGIS and follow the exact same steps as you did when you were using the Valhalla service hosted by FOSSGIS, but this time pick localhost instead of FOSSGIS. That’s it. Now you are able to create routes while being entirely offline. See the video below for details.
Valhalla can be easily self-hosted, too!. With the help of QGIS, a Valhalla server, and OpenStreetMap through Quick Map Services, one can create GPX routes entirely offline.
Alternative 3: QGIS with the OSRM plugin
Some people have reported using an OSRM plugin on QGIS for automatic routing, snapping points to paths, and exporting GPX files. Ujaval Gandhi posted on his blog (spatialthoughts.com), talking about the topic. I’m sure it works great, but I find his approach too complicated when alternatives are so simple and hassle-free. Thus, even though I’ve personally never tried to make it work, I will not dive into the topic, but list it here as a reference.
Alternative 4: Routing using the OSRM frontend
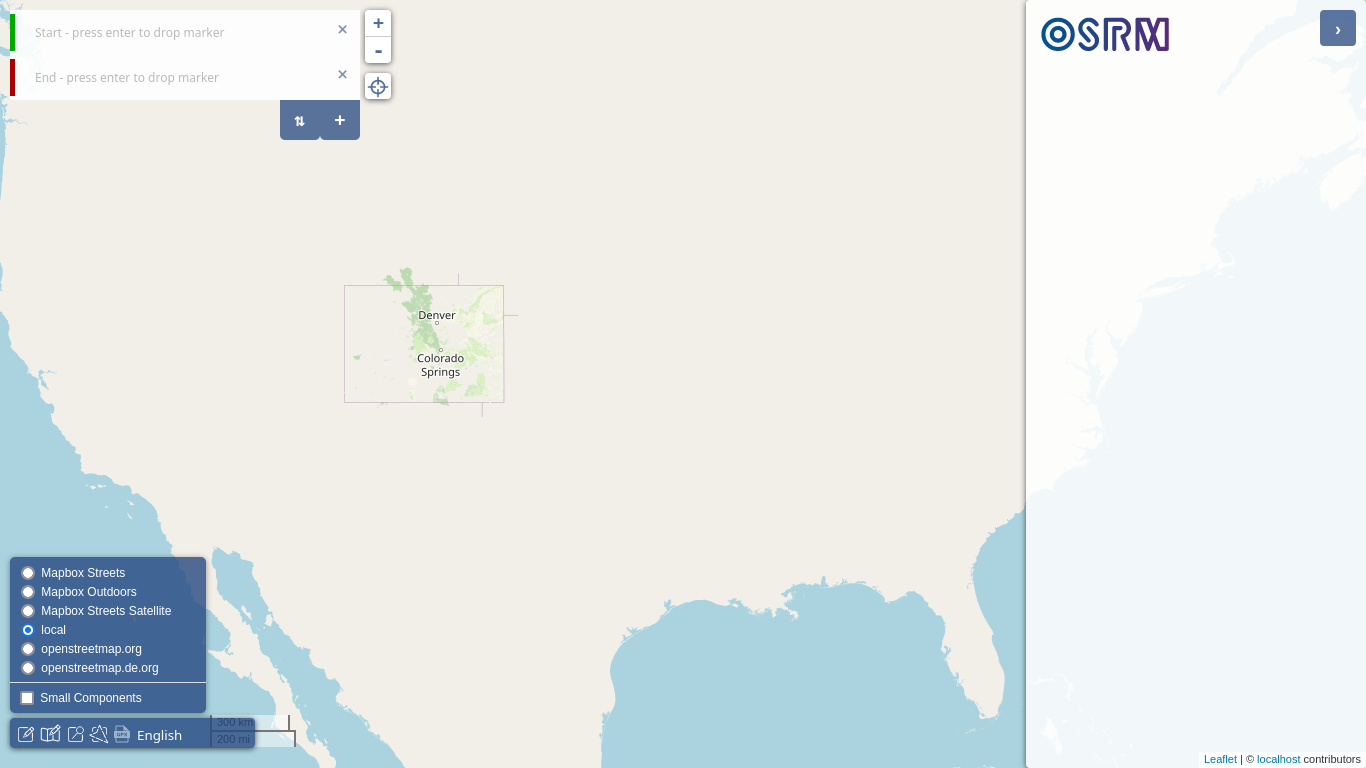
The Open Source Routing Machine (OSRM) is an amazing, free and open source routing platform capable of handling almost all the features mentioned above. You can check out their demo at https://map.project-osrm.org, to create a sample route. It is a tiny bit more complicated to use compared to some other options, but it is still user-friendly and the output files will look the same. The good news is that you can run it locally, fully offline, relying only on a free software license (BSD). Let’s see first how to use the platform.
Just like before, first navigate to your location of interest or start point. Then, select your activity of preference on the drop-down menu on the top left corner (“Car”, “Bike”, “Foot”). Press enter and click on your starting point, then click on your end point. The routing machine will automatically come up with a route for you. That’s it, that simple. Things get more complicated if you want to add detours or other constraints that were not present in the automatic routing. For that, you can grab and drag a point of the route back to where you want it to be. Keep adding constraints and moving your endpoint further, until you have the desired track. See the video below for details.
Video showing how simple it is to add constraints to reroute using OSRM on OpenStreetMap. It is a viable alternative if you would rather stick to non-proprietary services; that is, to avoid mapbox.
After you are done, click on the “Export GPX File” button, on the lower left corner. A file named route.gpx will be downloaded. I have a short video going through the full process below.
Video showing full process. In about two minutes you can generate a complete, detailed GPX file using exclusively online routing and mapping free software, no installation required.
The same service is available on other instances as well, like https://routing.openstreetmap.de/. I will explain how to self-host it below.
Self-hosting OSRM
TL,DR: Copy and paste the script I’m sharing here.
Self hosting OSRM is a great way of building your maps offline. It is simple to use, fast, and uses only services in docker containers, so you can do everything from a web browser. Of course, you can also build it from source, too. You can follow an awesome tutorial by datawookie here. But for now, I will describe how to do it using docker containers. For this approach, you will need three containers, one OSRM frontend, the OSRM backend, and the Open Street Map tile server.
Warning! All of this might take up a lot of space for a standard, single-user root partition. So it might be a good idea to change your docker directory from your root partition to something else. The example below took up 17G to map all of Colorado, plus 2G on my home partition for the routing machine.
To tell docker to use another path for storage instead of the root partition, I’m following this stack overflow answer. First, you’ll need to stop the docker service,
systemctl stop docker
and create a file /etc/docker/daemon.json, containing the location of your new docker directory,
{
  "graph":"/path/to/new/docker/directory"
}
Save and reboot. Your docker files will now be saved at /path/to/new/docker/directory.
To install the backend, first download the map for the location of interest. Again, I will use Colorado as an example. Using wget,
wget https://download.geofabrik.de/north-america/us/colorado-latest.osm.pbf
Then, fetch the data and start the docker container.
docker run -t -v "${PWD}:/data" ghcr.io/project-osrm/osrm-backend osrm-extract -p /opt/foot.lua /data/colorado-latest.osm.pbf || echo "osrm-extract failed"
The command will extract and pre-process the data. Notice that I am using foot.lua, but you can use bicycle.lua or car.lua, depending on your ways of transportation and routing preferences.
Now, finish processing the data.
docker run -t -v "${PWD}:/data" ghcr.io/project-osrm/osrm-backend osrm-partition /data/colorado-latest.osrm || echo "osrm-partition failed"
docker run -t -v "${PWD}:/data" ghcr.io/project-osrm/osrm-backend osrm-customize /data/colorado-latest.osrm || echo "osrm-customize failed"
Finally, start the routing server on port 5000.
docker run -t -i -p 5000:5000 -v "${PWD}:/data" ghcr.io/project-osrm/osrm-backend osrm-routed --algorithm mld /data/colorado-latest.osrm
At this point, you are ready to request routing directions from the HTTP server, at http://localhost:5000 using curl or whatever. Personally, I prefer to use the OSRM front-end, since it is so user-friendly. In order to do that, just run
docker run -p 9966:9966 osrm/osrm-frontend
There is one problem, though. There is no offline map on the front-end, as reported elsewhere. So you need to either use an online service (defeats the purpose of self-hosting) or install your own. Of course, we will configure our own. Basically, we will follow the official OSM tile server instructions from this link.
First, create a docker volume and link to your mapping data.
docker volume create osm-data
docker run \
    -v "${PWD}/colorado-latest.osm.pbf:/data/region.osm.pbf" \
    -v osm-data:/data/database/ \
    overv/openstreetmap-tile-server \
    import
This step will fetch and process some data from remote repositories. It can take some time (~10 min) depending on your connection and computer.
Now, run the server.
docker run \
    -p 8080:80 \
    -v osm-data:/data/database/ \
    -d overv/openstreetmap-tile-server \
    run
After a minute or two, you will have a tiling server on port 8080. If you access http://localhost:8080, you will see the map for the area you just configured it for. It takes some time to load everything, but you should be able to see your desired area’s map just fine.
 After running the local tile server, you can access http://localhost:8080 and see that the maps for the region of interest are properly loaded.
In order to allow requests from the localhost, you need to link your tiling server to osrm-frontend. By default, there’s no option to do this, so we need to do some tweaking. In my opinion, the most intuitive approach is to open the docker container interactively.
frontend_container=$(docker ps -a | awk '/osrm-frontend/{ print $1 }')
docker exec -it $frontend_container /bin/sh
And within the container, you will have to edit the file /src/src/leaflet_options.js. You can use either vi or sed for that.
- If you are using
vi, open the file below.
vi /src/src/leaflet_options.js
Add the following to line 15 using insert mode (i),
  local = L.tileLayer('http://localhost:8080/tile/{z}/{x}/{y}.png', {
    attribution: '.. <a href="https://localhost:8080">localhost</a> contributors'
  }),
and the following to (now) line 42.
'local': local,
That’s it. Save it with ESC + :x and now you should be able to see an option to use your localhost as shown below. Congratulations, you can route your stuff fully-offline now.
- Alternatively, you can use this
sedone-liner if preferred for whatever reason.
sed -i'' -e "14i\ local = L.tileLayer('http://localhost:8080/tile/{z}/{x}/{y}.png', {\n attribution: '.. <a href=\"https://localhost:8080\">localhost</a> contributors'\n })," -e "39i\ 'local': local," /src/src/leaflet_options.js
Regardless of your command of choice, you should be able to see the option to use your local tile server on the Open Source Routing Machine front end at http://localhost:9966, as shown below
 After editing leaflet_options.js, you should now be able to see a local option to use as your tile server. Congratulations, your maps can now be created fully offline!
Is it slightly impractical? Yes. But it works completely offline, that’s what matters. When you need it, at least you’ll have a solution within reach. I have built the route below entirely offline, so we know it works. I might (eventually) write a script that solves this problem and upload it to my git page.
 The same route I've used as an example here, but this time built entirely offline using OSRM, Open Street Maps, and an OSM tile server.
Full, working script for OSRM
If you don’t have the time to read whatever I described above, just copy and paste the script below in your shell and be happy.
wget https://download.geofabrik.de/north-america/us/colorado-latest.osm.pbf

docker run -t -v "${PWD}:/data" ghcr.io/project-osrm/osrm-backend osrm-extract -p /opt/foot.lua /data/colorado-latest.osm.pbf || echo "osrm-extract failed"

docker run -t -v "${PWD}:/data" ghcr.io/project-osrm/osrm-backend osrm-partition /data/colorado-latest.osrm || echo "osrm-partition failed"
docker run -t -v "${PWD}:/data" ghcr.io/project-osrm/osrm-backend osrm-customize /data/colorado-latest.osrm || echo "osrm-customize failed"

docker run -t -i -p 5000:5000 -v "${PWD}:/data" ghcr.io/project-osrm/osrm-backend osrm-routed --algorithm mld /data/colorado-latest.osrm

docker volume create osm-data

docker run \
    -v "${PWD}/colorado-latest.osm.pbf:/data/region.osm.pbf" \
    -v osm-data:/data/database/ \
    overv/openstreetmap-tile-server \
    import

docker run \
    -p 8080:80 \
    -v osm-data:/data/database/ \
    -d overv/openstreetmap-tile-server \
    run

docker run -p 9966:9966 osrm/osrm-frontend

frontend_container=$(docker ps -a | awk '/osrm-frontend/{ print $1 }')
docker exec $frontend_container sed -i.bak -e "14i\  local = L.tileLayer('http://localhost:8080/tile/{z}/{x}/{y}.png', {\n attribution: '.. <a href="https://localhost:8080">localhost</a> contributors'\n })," -e "39i\    'local': local," /src/src/leaflet_options.js
There you go, you should be all set now! You will need to repeat the last step every time you restart the docker service (modifying /src/src/leaflet_options.js again, since it gets rewritten at every boot).
To run the service at a later time after installation, you can run the four docker commands below.
docker run -t -i -p 5000:5000 -v "${PWD}:/data" ghcr.io/project-osrm/osrm-backend osrm-routed --algorithm mld /data/colorado-latest.osrm
docker run -p 8080:80 -v osm-data:/data/database/ -d overv/openstreetmap-tile-server run
docker run -p 9966:9966 osrm/osrm-frontend
frontend_container=$(docker ps -a | awk '/osrm-frontend/{ print $1 }')
docker exec $frontend_container sed -i.bak -e "14i\  local = L.tileLayer('http://localhost:8080/tile/{z}/{x}/{y}.png', {\n attribution: '.. <a href="https://localhost:8080">localhost</a> contributors'\n })," -e "39i\    'local': local," /src/src/leaflet_options.js
I will probably write a script that does all of this automatically, generalizing for several maps. Once it is ready, I will upload it and update this post, linking the script here.